Welcome to Haute Kippy - crochet craft and more!

If you're looking for ready made accessories available for purchase now, please contact me via email, or facebook. A selection of items from my design cache can be purchased directly from me locally, at craft shows or via mail. I am also available to for custom design work or commission to construct any published pattern. I accept all major credit cards and PayPal and I always ship for free!

If you're a fellow crafter, then you've come to the right place. Enjoy free access to all my crochet patterns, recipes and craft projects by navigating the tabs below or use the social media buttons to connect with me. You can also find clean, printer friendly PDF downloads of all my most popular crochet patterns available for purchase on Etsy and Ravelry!

Thanks for stopping by!
                              

Monday, March 27, 2017

Bitty Berries Coin Purse


Springtime is here! It's that magical time of year when crocheters start switching gears away from cold weather items. But what are you going to crochet if the leaves aren't falling or it's not snowing? Don't worry! I've got TONS of ideas and plans to make many fun free patterns to keep you crocheting all spring and summer.


You're going to get this lovely coin purse for starters, and as a bonus, I've just decided to make a matching checkbook cover! We're going to make some fun Easter bunny ears, a cute storage basket, a new headband, and crocheted stool covers for those kitchen bar stools- just to name a few. I'm not giving away all my secret plans, but I want you to rest assured, it will be a beautiful Spring/Summer season here at Haute Kippy!

I love textured crochet stitches, and next year, I plan to focus more on stitches and textures as I develop new patterns. There are often many different names for the same stitch, as terminology varies on opposite sides of the pond, throughout the internet, and over time with changing trends.

I've worked quite a bit in bobble stitch in the past. What differentiates bobble from berry is the cluster. When making a bobble, you are starting multiple double crochets in the same stitch, and then finishing the dc's like a decrease, pulling through all the loops on the hook.  Patterns such as my Pretty Little Purse, Pom Pom Boot Cuffs, and Kip's Bun Hat feature bobbles. They are fun to make and look super cute on accessories of all kinds!


For the Bitty Berry Coin Purse, we're working in the Berry Stitch. This differs from bobble by creating a small dainty bump texture that kind of looks like a blackberry. The berry is created when the wrong side of a triple crochet (abbreviated tr) is forced out behind your work when sandwiched between two single crochets on either side. So the pattern repeat for working berry stitch is: sc, *tr, sc*. Every tr becomes a berry, and the pattern becomes evident as you turn the work and repeat.

Yarns featured in photographs are Hobby Lobby's I Love This Yarn Neons in Pink Neon and Crafter's Secret in Pearl Fleck. We're going to work this purse in one piece, edge it, slip stitch the sides shut, sew on a button, weave in our ends and fill it up with all your loose change. Loose change is awful. It doesn't really fit in that tiny zippered pocket in your wallet. It makes wallets bulge and become too heavy. Loose change is all over the bottom of your purse, it's filling up your wristlet and becoming a total nuisance. You need a coin purse, or else you know someone who does.

Let's get started!


Bitty Berries Coin Purse Free Crochet Pattern


You may sell items made from this pattern, but you must credit Haute Kippy with the original design and provide my website for reference. You may not use my photographs to sell your items. Do not copy, distribute or repost this pattern in part or in whole, do not alter or redistribute this original work as your own. If you wish to share, you may link to my website only. Copying with intent to share is a form of theft and is a copyright infringement. Thanks for respecting my work!


Difficulty: Easy
Hook: E4/3.5mm
Yarn: any worsted
Notions: yarn needle, 1” button
Gauge: 4x4 berry repeats = 2” square
Measurements: 3.75” across, 2.5” tall

Special Stitches:
Berry Stitch *tr, sc* - triple crochet, single crochet, repeat
Sc2tog- single crochet two together, a single crochet decrease

Note: Purse is worked in one piece from bottom to top, the bottom is folded up to become the front of the purse and the top is folded down to become the closure flap. The purse is first edged, then folded and side seams slip stitched shut. A button is sewn onto the front to secure purse contents. E hook is a smaller hook that is usually sold separately from most hook sets. If you do not have an E, may substitute F or G but must crochet very tightly, purse will be slightly larger than given dimensions. Turning ch does not count as a st.

Coin Purse:

Chain 14
Row 1: sc into second ch from hook, and in each ch across, ch 1, turn. (13 sc)
Row 2: sc, *tr, sc*, repeat ** across, ch 1, turn. (6 berries made)
Row 3: sc in each st across, ch 1, turn. (13 sc)
Rows 4-9: repeat rows 2 and 3, three more times. (4 rows berries total)
Rows 10-13: sc in each st across, ch 1, turn.
Rows 14-21: repeat rows 2 and 3, four times. (4 more rows berries made)
Rows 22-24: sc in each st across, ch 1, turn.
Row 25: sc2tog, sc 9, sc2tog, ch 1, turn.
Row 26: sc2tog, sc 7, sc2tog, ch 1, turn.
Row 27: sc2tog, sc 5, sc2tog, ch 1, turn.
Row 28: sc2tog, sc 3, sc2tog, ch 1, turn.
Row 29: sc2tog, ch 3, sk next st, sc2tog, do not break yarn. (buttonhole made)

Finishing:

1. Pivot work to crochet along raw edge. Keep right side facing you. Sc evenly around entire raw edge of purse, making 1 sc in the end of each row. For the buttonhole, make 3 sc in the chain space of the hole. When you come to the bottom edge, sl st along the foundation row, then continue sc evenly along. Join the round when complete. Fo, weave in ends.

2. Fold bottom up to form front of purse, ensure berries are evenly aligned on front and back.

3. With front of purse facing, sl st sides of purse together by beginning at the corner, and sl st through both layers, up the side towards the flap, then sl st across the front of the front of the purses’ opening and back down the other side through both layers to the bottom of the purse.
Sew button on front of purse in the very center of the berry motif: 3 berries over and 2 berries down. Weave in any remaining ends.

Don't forget, there'll be a matching checkbook cover coming soon! If you are jonesing more beautiful berry patterns check out allfreecrochet.com to see what other designs you can make using the versatile and cute Berry Stitch. All Free Crochet is the ultimate resource for finding the newest and cutest crochet patterns, and they're always free!

Let me know what you think of this pattern: comment below, or share your work with me on instagram #hautekippy. Connect with me on facebook, and Ravelry. See my inspiration and what I pin on pinterest!

You can support Haute Kippy and help me bring the crafting community more fun free projects by visiting my Etsy Shop, where limited quantities of ready made items from my design cache can be found as well as ad-free, printer friendly PDF downloads of my most popular crochet patterns.

Enojoy this beautiful weather, go crochet outside! Take care,

xoxo - Bethany


Tuesday, March 14, 2017

Easy Fishnet Gloves


They say, "necessity is the mother of invention". In my house this is literally true. More often than not when someone needs something or something needs to be repaired, I find a way to create, fix, or rig up the item instead of buying new. I really enjoy being industrious. It's a fun challenge and is a satisfying way to be frugal. I would always rather make something we need with materials on hand instead of searching, shopping or waiting for an item. And nothing is more fun to make yourself than costumes!


This leads us to "Spirit Week". Schools have these a couple times per year and they are super fun. Kids have themed school days for which they are encouraged to dress up. I love helping my daughter put together fun Wacky Wednesday or Nerd Day outfits. Recently, one of our Spirit Week days was 80's day! 80's fashion was so fun and flashy, it remains a staple costume theme and I don't think it's going anywhere any time soon. 

My daughter's 80's costume was based on the popular athletic style trends. We found an off the shoulder cropped sweater, and layered it with a studded tank top. Then we added leggings, and of course- leg warmers! I made my legwarmers (pictured below) a long time ago when I was first learning how to crochet, and there's no pattern for them, unfortunately. If you need a legwarmer pattern, visit allfreecrochet.com and search their amazing database of free crochet patterns to find the perfect legwarmers for your 80's costume or to complement your winter wardrobe! 

We also did a side ponytail and added her big cheerleading bow for fun. Her football team's colors are orange and black so with all that pink, we needed to add one more accessory in orange to complete the look.

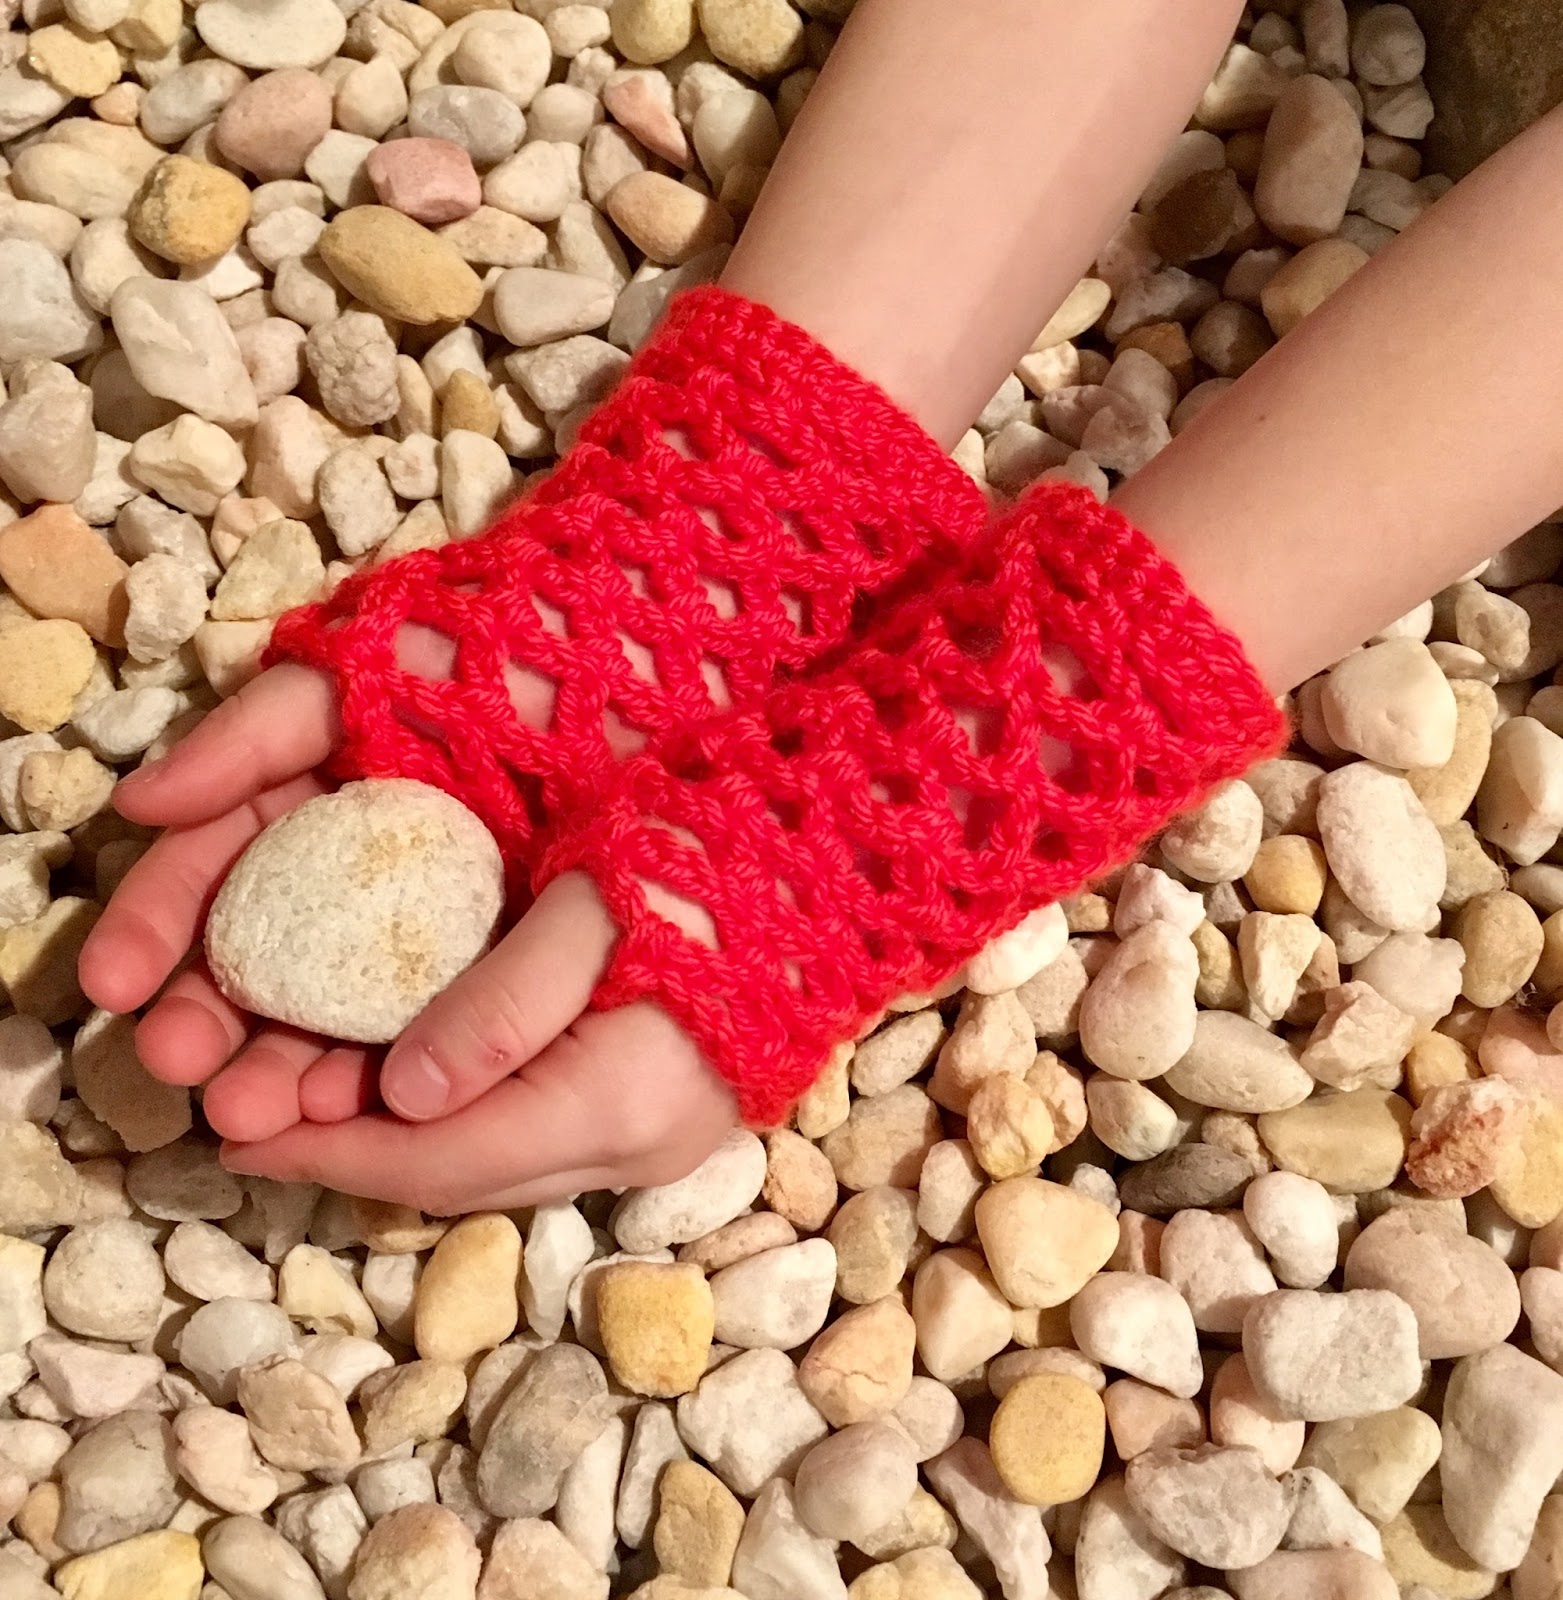
I knew I wanted to make her some fishnet gloves. What could be more 80's? The night before 80's day, I figured I'd skim the interwebs for free crochet patterns to see what I could find and whip up for her. I did find a couple on Ravelry, and they looked OK, but I wasn't completely satisfied and they didn't come in children's sizes. So I played around and came up with my own easy pattern for fishnet gloves. Really, our family motto should be, "If you can't find what you want, make it yourself!" So, thanks to 80's day, here's another fun pattern for the crochet world!

The 80's fishnet costume gloves are worked using a very simple method, mostly chaining, and can be easily resized for a custom fit for any person, any age, any size hand! The netting is worked using a base row with a multiple of three. No complicated thumb holes, simply use any opening in the netting. They can be worn long up the arm, or low on the hands. Add or delete rounds for a custom length. Try in a cool neon variegated yarn for a very 80's look!

To make these gloves for an adult simply measure the hand/wrist, check the pattern gauge and work accordingly in a corresponding multiple of three. The pattern as written fits a child's hand 6-8 years. 


Easy Fishnet Gloves Free Crochet Pattern


Hook: E4/3.5mm

Yarn: Any Medium/Worsted Weight

Gauge: 8 sts = 2” fhdc

Measurements: Child size, as written is 6 ½” around, 5 ½” long  

Difficulty: Easy

Special Stitches:

Fhdc- Foundation Half double crochet: ch 2, yo, insert hook into 2nd ch from hook, yo draw up a loop, yo draw thru first loop on hook (same as making a ch 1), yo draw thru all loops (first fhdc made). To continue fhdc: *yo, insert hook thru “v” on top of last st made, yo draw up a loop, yo draw thru first loop on hook, yo draw thru all loops*. Repeat ** to desired # of sts.

Note that beginning chain and foundation row will be made simultaneously with this method, and the work will fall vertically from your hook as it is formed. The V’s closest to and facing your hook hand will be the top of the stitches that you work into for the next round, the v’s on the opposite side, are the bottom of your work when held horizontally. If you need further assistance with this stitch, please search for and watch tutorial videos on YouTube.

If you just aren't feeling it and don't want to fhdc, simply make a foundation ch in appropriate number of chs, join, and then hdc into each ch, join, and then continue pattern at round 2. Easy peasy.

Abbreviations:
Sl st - slip stitch
Sk - skip
Ch - chain
Ch sp - chain space
Prev. - previous
Sts - stitches

Netting pattern multiple x3:
To resize pattern for larger or smaller hand: see gauge, measure hand/wrist, round number of sts needed up or down to make a multiple of 3, work accordingly.

Round 1: Fhdc 27, join with a sl st. Use the starting tail to join the bottom edge of the foundation round.

Round 2: *ch 4, sk 3 sts, sc in next st*, repeat ** around to last 3 sts, ch 2, dc in first ch made (at join from prev. round).

Round 3: *ch 4, sc in next ch sp*, repeat ** around to last ch sp, ch 2, dc in top of dc from prev. Round.

Rounds 4-12: Repeat Round 3 or to desired length, fo, weave in ends.

Use any hole in netting for thumb hole.

You may use this free crochet pattern to make and sell items, please do not redistribute or re-write it in any way. You must credit me with the design on any sales of finished product. This written pattern is an original work (c) 2017 Haute Kippy by Bethany Sypolt

Did you enjoy using this free pattern? Support Haute Kippy and the creation of more free patterns with a thank you gift of $1.00 donate securely and safely with PayPal at paypal.me/HauteKippy

Share your work on Instagram #hautekippy or post a picture on my Facebook page! Find me on Ravelry, Pinterest or AFC!

Select ready made items from my design cache along with printer friendly, ad free PDF downloads of my most popular crochet patterns are available in my Etsy shop!

Enjoy!
xoxo, -Bethany

Monday, February 27, 2017

Gina Messy Bun Hat


Hi friends, this post contains affiliate links.

Are you still loving the messy bun hat trend? I sure am! I think lots of designers and crocheters are just getting started and some may even have designs stashed away for next fall. Here in West Virginia it seems spring is already upon us. We've had a banner week of warm and unseasonable temperatures- but that doesn't mean winter is over. We usually have a final snow at the end of the season around Easter, and I'm on the lookout for the temps to drop.


That's why I've got one more bun hat for you this winter. Like my other design this hat is made from the top down starting around an elastic hair tie. I really love using post stitches. They create such great texture and long lines. I've also had fun working the the third loop of crochet stitches. Another pattern that uses this technique is my Luxury Spa Wrap. You can read that guest post for more information about how to crochet in the third loop. The technique is described in detail in the main post on Stitch and Unwind


If you'd like to own this pattern in a clean, portable, printer friendly, ad-free version, a PDF download is available in my Etsy shop, OR click the buy now button  to get it from my Ravelry shop! Thanks for supporting more free content from Haute Kippy!

In case you need supplies, these are my favorite hooks:

...and this is my favorite yarn! I simply adore the feel and workability of Red Heart's With Love line. The Gina hat featured is photographed in Pewter.


If you haven't seen my latest announcement, then let me tell you about my new eBook! I've compiled my favorite and most popular winter weather crochet patterns into a new eBook, and I am giving away 10 free copies! Simply subscribe to the blog and you will be entered to win! You can own the Gina pattern and so much more! Click here for more information. *contest ended Januart 2018*

Enter your email address:


Delivered by FeedBurner


Gina Bun Hat Free Crochet Pattern


Difficulty: Easy
Gauge: 6 sts = 2" in hdc and 5 rows fpdc = 2"
Hook: H8/5mm
Yarn: Red Heart Super Saver in Heather Gray or any worsted
Finished size: apx 20" around and 7.5" from elastic to brim before stretching to fit.
Notions: yarn needle, elastic hair tie apx. 2" in diameter

Special Stitches:

fpdc- front post double crochet: yo, insert hook from front to back around post of indicated st on the right side of work, yo, and draw up a loop, yo draw thru 2 loops, yo draw thru last 2 loops on hook. fpdc made. 

hdc in 3rd loop: keeping right side racing, yo, insert hook into third loop (horizontal bar located directly below "v") on the wrong/back side of the indicated st, yo draw up a loop, yo draw thru all loops on hook. This forces the "v" on the top of the stitches of the prev round to fold over and face outward, creating a horizontal "knit-look" pattern on the right side of the work.

Note: Turning chs at beg of rounds do not count as sts. Make first st of round in same st as turning chs. Be sure to meet gauge to obtain size listed in pattern. Feel free to adjust hook size or number of rounds before brim in order to make a custom fit.


Gina Bun Hat:

Round 1: Join yarn to elastic hair tie and ch 1, hdc 30 around hair tie, join with a sl st to first hdc, ch 2.

Round 2: dc in the first st, and in each st around, join, ch 2. (30 sts)

Round 3: dc in first st, then fpdc around same st, *dc around next st then fpdc around same st*, repeat ** around, join, ch 2. (60 sts)

Round 4: dc in first st, fpdc in the next, *dc, fpdc*, repeat ** around, join, ch 2.

Rounds 5-12: repeat round 4, ch only 1 at end of round 12.

Round 13-15: hdc in third loop of each st around, join, ch 1.

Round 16: sc in the third loop of each hdc from the prev round, join, do not ch.


Round 17: sl st loosely in each st around, join, fo.

Hint- a blind join looks great here, at the end of round 17. 

Here's how: sl st around until one st remains. Cut yarn leaving long tail for weaving in ends. Pull tail all the way through last sl st, eliminating the loop your hook went through. Thread yarn needle with tail. Sew yarn tail under "v" of next st (the first sl st made), and through the other side. Sew tail in through middle of the last "v" made and out on wrong side of work. Invisible join made. Knot tail once and then weave in ends as normal.

And there you have it! The fabulous plush ridges of the Gina Bun hat, with a stylish knit look brim.


Pattern Update! - Gina Beanie

I've had a request to turn the Gina into a beanie (with no hole at the top). I worked out a great looking conversion. We're still making the hat from the top down, but instead of crocheting into an elastic hair tie, we'll start with a ring...

Form magic ring.

Round 1: dc 15 into magic ring, join with a sl st to first dc made, ch 2. Pull starting tail to tightly close ring. (15 sts)

Round 2: dc into first dc, then fpdc around same st, *dc around next st then fpdc around same st*, repeat ** around, join, ch 2. (30 sts)

Round 3: dc into first dc, then fpdc around same st, *dc around next st then fpdc around same st*, repeat ** around, join, ch 2. (60 sts)

Round 4: dc in first st, fpdc in the next, *dc, fpdc*, repeat ** around, join, ch 2. (60 sts)

Rounds 5-14: repeat round 4, ch only 1 at end of round 14.

Round 15-17: hdc in third loop of each st around, join, ch 1.


Round 18: sc in the third loop of each hdc from the prev round, join, do not ch.

Round 19: sl st loosely in each st around, join, fo.

And that should do it to convert the Gina Bun Hat into the Gina Beanie! Let me know what you think of this conversion, and if it works out for you! 

An ad-free, printer friendly, downloadable PDF of this pattern can be purchased in my Etsy Shop or from my Ravelry Shop.  

If you just have bun hat fever and you can't get enough, then I suggest you visit allfreecrochet.com and check out their collection of 29 free bun hat patterns! They are all very cute and I'm so fortunate that my original design, "Kip's Bun Hat" was chosen among these fabulous patterns. All Free Crochet is an amazing resource for free crochet patterns of every kind. 

Let me know what you think of this pattern! Comment below, or share your work with me on instagram #hautekippy. Connect with me on facebook, and Ravelry. See my inspiration and what I pin on pinterest!

You can support Haute Kippy and help me bring the crafting community more fun free projects by visiting my Etsy Shop, where limited quantities of ready made items from my design cache can be found as well as ad-free, printer friendly PDF downloads of my most popular crochet patterns.  

Enjoy!

xoxo- Bethany


Monday, February 13, 2017

Toddler Quick Mitts


My little one loves to wear mittens. She also loves pockets. If a shirt or pants have pockets in them she gets very excited and wants immediately to hide her little hands. I've bought some small mittens for her in the past, and we always seem to loose one of the pair. Where it goes, we'll never know. 


Northern West Virginia winters are long, gray and a mixture of snow, rain, sunless days and varying temperatures. One week, we expect snowfall, the next moderate temps and intermittent rain. It's super fun.... not. As a rule of thumb in our family, we wear coats until April. Just because it's randomly 56 degrees today doesn't mean you can run around coat-less. It's not good for the body, and roller coaster highs and lows contribute a lot to decreasing people's immune systems. 

We can also experience very cold temperatures. Two winters ago, we had an arctic blast that still shows its visible scars on many trees and bushes. It was so cold that even some evergreens were dying. Driving down the road, I can still see many people's trees and bushes have dead branches on their lower third where the sub-zero air and snow touched them. A reminder of that bitter cold winter. 


This is why children need mittens. They need super cute mittens, easy mittens- ones you can whip up yourself in minutes. That's what I did for my little one when I realized she might need them, and the only pair I could find was no longer a pair! 

These Toddler Quick Mitts can be made using any worsted weight yarn, and a size H8/5mm hook. Employing the same techniques as the adult Quick Mitts, these baby versions are sized down for a 2-3 year old and completely cover little fingers, keeping them safe and toasty warm. 

Of course if you live in a warmer environment, or you need your toddler to be able to play on a tablet or phone while wearing mittens, simply stop and fasten off at the last row before the decreases to make chic little fingerless versions. 


Make it unique:
-Try in a colorful variegated for even more fun! 
-Use remnants for a fun and quirky boho style stash buster project!
-Stripe the rows for an easy exercise in color work!
-Customize or alternate colors for team spirit! 

Let's get started!


Toddler Quick Mitts Free Crochet Pattern


Hook: H8/5mm
Yarn: Any Worsted
Notions: Yarn needle
Gauge: 6 sts=2” in hdc
Size: 2-3 Years (6 ½” from fingertip to cuff and 7” around palm)
Difficulty: Easy


Special Stitches:
Hdc2tog- Half double crochet two together: yo, insert hook into st, yo, draw up a loop, yo, insert hook into next st, yo, draw up a loop (5 loops on hook) yo, draw through all loops. Hdc decrease made.


Notes: Left and Right Hand gloves are made identically, except for thumb hole round. See instructions for more details. Joined rounds are worked as follows: make first hdc in next st (after join), at round end, make final hdc in join st. On thumb rounds only, joins are left unworked.


CUFF:
Chain 7
Row 1: hdc in third ch from hook, and in each st across, ch 2, turn. (5 sts)


Row 2: hdc in the blo of each st across (5 sts), ch 2, turn.


Rows 3-12: repeat row 2. Ch only 1 for end of row 12. Do not break yarn.


Fold cuff in half  to form a tube, lining up stitches. Working through both layers, sl st through the back loop and front loop of both ends to sl st the cuff together into a tube shape. Pivot cuff to work along raw edge, keeping right side facing. Ch 1, sl st loosely and evenly around raw edge of cuff (19 sts) do not join, ch 1.


MITTEN:
Rounds 1- 2: hdc in each st around, join, ch 1. (19 sts)


Round 3 FOR RIGHT HAND MITT: hdc, ch 2, sk next 2 sts, hdc in each st around, join, ch 1. (17 sts + 2 st space) Thumb hole made.


Round 3 FOR LEFT HAND MITT: hdc in each of the first 16 sts, ch 2, sk next 2 sts, hdc in last st, join, ch 1. (17 sts + 2 st space) Thumb hole made.


Round 4: hdc in each st around, join, ch 1. (19 sts)


Rounds 5-8: repeat round 4


Round 9: hdc2tog, hdc2tog, hdc in each of next 6 sts, hdc2tog, hdc2tog, hdc in each of remaining 5 sts, join, ch 1. (15 sts)


Round 10: hdc2tog, hdc in each of next 4 sts, hdc2tog, hdc2tog, hdc in each of remaining 3 sts, join, ch 1. (11 sts)


Round 11: hdc2tog four times, hdc, hdc2tog, join, fo. (6 sts) Sew small hole shut with yarn tail, weave in ends.


THUMB:
Round 1: join with a hdc to bottom edge of thumb hole, and hdc evenly around as follows: hdc 2 along bottom edge, pivot, hdc 2 along side, pivot, hdc 2 along top, pivot, hdc 2 along side, join, ch 1. (8 sts)


Round 2: hdc around, leave last st unworked, join ch 1. (7 sts)


Round 3: hdc2tog around, leave last st unworked, join, fo. (3 sts)  Sew small hole shut with yarn tail, weave in ends.

I hope you enjoyed making the little love in your life an adorable and warm pair of winter mittens! Share your work with me on facebook, instagram or pinterest! #hautekippy

xoxo- Bethany


Tuesday, February 7, 2017

Luxury Spa Wrap

Hey There! I'm really excited about this new design- and I know you're going to love it. It works up super quick, and is so lux!

I came up with this design to solve a very real problem that I was having... bangs. Well, my bangs aren't really a problem until I go to wash my face. Recently, I got my hair cut and the stylist trimmed my wispy side-swept bangs a bit shorter than usual.  After about a week of wet hair before bed, the light bulb finally went off. I needed to make myself a head wrap. But I didn't want it to be made of just any yarn. I wanted it to be luxurious!


This wrap is supposed to envelop your crown, gently and softly holding back your hair while you wash your face at night or do your makeup in the morning. Where could I find the perfect yarn to make my perfect head wrap?

Bernat Blanket yarn of course! It's just the right choice to make ourselves a little treat.


I'd been eyeing Bernat Blanket Yarn in the store every time I went yarn shopping, but couldn't justify the purchase until I came up with a purpose. I would pick it up, feel it, ponder it's uses, and put it back on the shelf- every time! After coming up with this design idea, I knew blanket yarn would be perfect for a bath or spa use. 


Are you ready? Here's what we need for this project: 

-1 skein Bernat Blanket Yarn 
-2 one inch buttons
-yarn needle
-size L/8mm hook

This pattern is being featured as a guest post on Stitch and Unwind! Click the link below to be directed to the free pattern. Show me your work- let's connect on facebook, instagram #hautekippy or pinterest!

Click Here to view the Luxury Spa Wrap Free Crochet Pattern on StitchandUnwind.com

Wednesday, January 25, 2017

Kip's Bun Hat


Hi friends! This post contains affiliate links.

The messy bun hat. It's viral, it's trending, it's everywhere. 


I first saw this hat in a shared post on facebook. It was a blonde girl, wearing a normal looking beanie, toboggan, skully hat- depending on what part of the country you're in. The yarn was variegated in jewel tones, and reminded me of Red Heart's Unforgettable in Stained Glass. Only, there was something different going on, she had a pile of blonde hair on top of her hat! What sorcery is this!? Imagine, a winter hat with a hole on top for people to pull their lengths of hair through. It's so simple its genius. Who came up with the first bun hat? I wish I knew. Great ideas like that become truly amazing when they go viral. Whoever that crocheter is, they must be awfully proud of themselves! That same picture I saw can be found with a pattern on Ravelry. Since seeing that first post, bun hats have blown up. Everyone is making them!


I admit I was intrigued at first, but I soon felt an aversion to the trend creeping around in my head as I mulled the idea. 


I'm going to tell you a secret. There are two things I really don't like crocheting: hats and scarves. I know, lame. I specialize in accessories, it's practically the only thing I do. Yet the two things I avoid making at all costs are the two most popular accessories that crocheters and knitters make and sell. There are reasons for this. A: I think scarves are boring. They are long, repetitive and take forever to make. I feel queasy just thinking about it. And 2: Everyone and their grandmother (literally) makes hats. I've seen table after table at craft shows of crocheted hats, and I want to be different. 


I want to make things people want but can't find. If I set up a vendor table somewhere (still waiting on an answer to the prayer of having my first table) I want to have unique and original designs that outshine plain ol' hats and scarves. Mostly I want to keep my creative juices flowing so that I can turn my new ideas into workable free patterns for all the crocheters out there. BUT, I also want to give the people what they want.


...And the people want MESSY BUN HATS! 


Sometimes when I'm creating a new design, I search for inspiration, I look at pictures and see what else is out there. This time, I shut my computer, got out the old pen and paper, and began to crochet. I wrote down my pattern round by round, and created it completely on the fly. Finally when I was done, I searched "bun hat" on Ravelry, and I'll be darned, not one of those hats looked anything like this one! This hat is a very unique design indeed, and I'm so pleased with it. I hope you will be too.


I'm not sure how other bun hats are constructed, like I said I went into the design process blind, but this hat is made from the top down, and starts with a pony tail hair elastic. I piggy backed off of my latest boot cuff pattern because I really like it when things match and people can have sets of accessories. From the top of the hat, we graduate down into the same bobble repeat as the Pom Pom Boot Cuffs. For the rim of the hat, another familiar pattern repeat- the ribbing from the Sweet Scallops Boot Cuffs. These signature design features make Kip's Bun Hat a fun addition to your Haute Kippy collection, or any accessory wardrobe.


Lets get started together! Share your work on facebook or instagram, #hautekippy, connect with me on the Haute Kippy facebook page and find me on Ravelry


If you would like to OWN this pattern, an ad-free printer friendly PDF download is available in my Ravelry shop and my Etsy shop. Your small convenience purchase supports more free content!


If you haven't seen my latest announcement, then let me tell you about my new eBook! I've compiled my favorite and most popular winter weather crochet patterns into a new eBook, and I am giving away 10 free copies! Simply subscribe to the blog and you will be entered to win! You can own the Gina pattern and so much more! Click here for more information.


Enter your email address:


Delivered by FeedBurner

Kip's Bun Hat - FREE Crochet Pattern


Hook: H8/5MM
Yarn: Worsted
Gauge: 6 HDC = 2” OR 1 bobble repeat = 1”
Difficulty: Easy
Materials: 1 hair elastic, yarn needle


Here's a link for some hair ties that will work perfect with this pattern, just in case you don't have any laying around the house! 


Special Stitches:


Hdc Inc- half double crochet increase, make two hdc in the the next st


Bobble Stitch - yo, insert hook into next st, yo, draw up loop, yo, draw thru two loops, *yo, insert hook into same st, yo, draw up a loop, yo, draw thru two loops*, repeat** two more times, (5 loops on hook) yo, draw thru all loops. Bobble will poof out behind work.


Fpdc- front post double crochet: double crochet around the front of the post of the indicated stitch, instead of into the “v” on top of the stitch as usual.


Note: Ch 1 at beginning of round does not count as a stitch. Always make first stitch of round in same stitch as join & ch 1.


Hat:


Join yarn to hair elastic, ch 1.


Round 1: Hdc 30 around hair elastic, join with a sl st to the first hdc, ch 1. Keep right side facing. (30 sts)


Round 2: *hdc, hdc, hdc inc*, repeat ** around, join, ch 1. (40 sts)


Round 3: *hdc, hdc, hdc, hdc inc*, repeat ** around, join, ch 1. (50 sts)


Round 4: *hdc, hdc, hdc, hdc, hdc inc*, repeat ** around, join, ch 1. (60 sts)

Round 5: hdc in each st around, join, ch 1. (60 sts)


Round 6: Turn work so wrong side is facing, sc in the first st, bobble in the next st, *sc, sc, bobble*, repeat ** around up to last st and sc in that last st, join, ch 1, turn. (20 bobbles)


Rounds 7 & 8: sc in each st around, join, ch 1. (60 sts)


Round 9: repeat round 6.


Rounds 10 &11: repeat rounds 7 & 8.


Round 12: repeat round 6.


Rounds 13 & 14: repeat rounds 7 & 8.


Round 15: Repeat round 6.


Rounds 16-18: With right side facing, hdc in each st around, join, ch 1, ch 2 for round 18. (60 sts)


Round 19: dc in each st around, join, ch 2. (60 sts)


Round 20: *dc, fpdc*, repeat ** around, join, ch 2. (60 sts)


Rounds 21: repeat round 20, do not ch 2 on last round.


Round 22: sl st loosely around rim of hat, join, fo, weave in ends.


© Haute Kippy 2017


You may sell items made from this pattern, but please be courteous, always credit Haute Kippy with the original design and link to my blog when possible Do not use my photographs to sell items.

Original pattern “Kip’s Bun Hat” copyright Haute Kippy by Bethany Sypolt 2017


ad